If you want to read about how we decided to stay in this part of India, how we found this place, and how we spent our time here, you can read Part 1, Part 2, and Part 3 of this series of posts.
This place was ideal for us to take up all the projects we wanted to do for a long time. One of them was gardening. During our travels, we spent a good amount of time staying on farms in Spain (
Orgiva), Portugal (
Mexilhoeira Grande), and Thailand (
Gaia Ashram and
Buri Ram). We also spent a bit of time in Austria working with
a farmer and helped him whenever we could. We had a bit of experience in gardening and farming, but we never created our own garden from scratch. This was an opportunity for us to experiment with what we knew about gardening, and learn things we didn't know. This blog post is an insight into our experiments with gardening while we stayed here.
Land and Terrain:
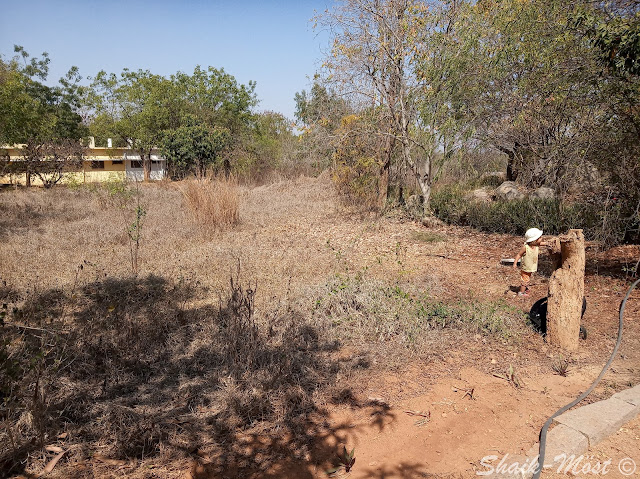
The area was extremely dry with sandy soil with almost no rain in the previous year. The temperatures in summer went up to 42ºC (108ºF). The water supply was only by pumping water from the ground. Even though the land was very testing, there was nature around the place. Animals and birds were passing by all day, and bees were flying around the area often. So we felt like there was a chance to create the right environment so the plants can take the support of already existing nature around them and produce some harvest. One decision we made was to not use any chemicals or fertilisers but only use the materials that were locally available around the area. We had no idea how it would all turn out. But again, our goal was not to produce a big harvest, but to experiment as much as possible and learn from it as much as possible. And this is how our experiments in gardening began....
 |
| The area we selected to grow our garden |
Designing the garden and preparing the land:
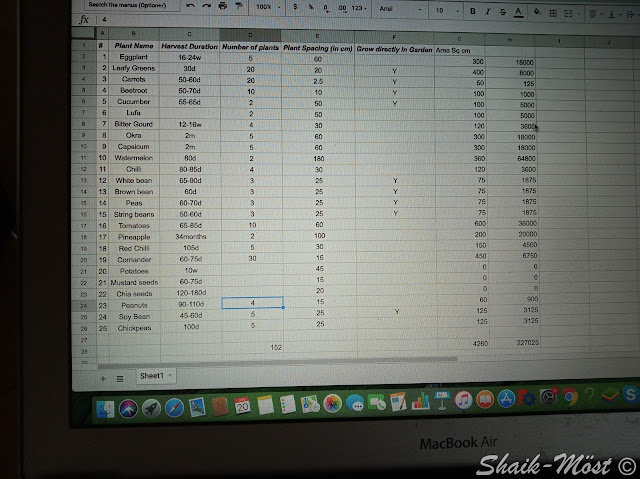
We picked an area that had good amount of sun and shade during any given day. The first thing we had to do was to decide which plants we were going to work with. We spent a few days researching online about the types of plants that would survive in this weather and terrain. We also collected some information on the amount of time seeds of different fruits and vegetables would take to sprout, the time for harvest, and the amount of spacing recommended between each plant. We came up with the dimensions for the plot. We also read a bit about which plants go well with what other plants (companion planting) and how much sun is needed for which type of plants. Based on this, we came up with a list of about 25 plants that we wanted to experiment with. During this round of experiments, we wanted to start the garden only from seeds and not use any saplings.
 |
| Garden planning spreadsheet |
The land was very sandy, dry, and hard. The first thing we did was to pull out all the dry weeds and grass. The next step was to prepare the beds. Digging the land was almost impossible with the tools we had as the soil was very hard. So we decided to water the entire area a few times and then start preparing the land. Universe heard our wishes and there was a drizzle for an entire day just when we wanted to prepare the beds. The soil became wet. Without loosing any time, we spent an entire day digging out beds and shaping the garden. Once the pits for the beds were ready, we had to prepare the beds. For this, we wanted to use all the techniques we saw in other farms/gardens we worked at, things we read online, and stuff we wanted to experiment with. So we prepared the beds with a lot of different materials -
Adding a Fence:
We wanted to also use only local material for this but we realised that we had to buy a few things from the market to make the fence durable and usable. We first used a '
country twine' to protect the garden, but the squirrels loved the ropes so much that they bit them into pieces and carried them away. So, we bought a sturdy rope of about 100 metres long and used it for the fence. We collected a lot of branches thin and thick from the
bamboo and
Subabul trees around the garden and cut them into sizes that we needed. The local predators we had to worry about were goats, squirrels, rabbits, dogs, peacocks, and chicken. We decided to create a fence that had the bottom part made with a lot of small sticks so that the sun could come through but the space between them was so narrow that the animals couldn't come in. We also tried to create a natural fence by planting cilantro/coriander, garlic, and basil plants around the garden to repel at least insects.
 |
| Sam digging holes to add a fence |
 |
| Kathi and Nora looking at the fence and the garden |
Preparing seeds and seedlings:
Planting:
Mulching and watering:
The first thing we learnt from our experience in the past is to mulch and cover the soil around the plant with leaves, dry grass, or anything to protect the soil and micro-organisms from heat and also help soil retain its moisture. We mulched everything we planted. As the soil was very hard, the only way the plants could grow roots was when the soil was wet and soft. So we tried to keep the soil as moist as possible without wasting too much water. This helped many plants, but some could not survive the intense heat and also they needed a lot more support under their root penetration through soil, compost, and moisture to be able to grow.
Protecting from insects:
As the plants started growing, the insects that were wandering for food in the dry area found some food to eat in our garden. They all started clobbering around the bean plants. We didn't wanted to use any chemicals so we did research on how we could create natural barriers between healthy plants and the insects. We found that a mixture of red chilli powder, garlic, and water mixture is an effective repellent of insects. We sprinkled that mixture on the leaves and around the base of the plant. It seemed to help. We also made sure that we did not spray this mixture during sunny days as it would've burnt the leaves. The other issue we had was snails, especially during the nights. The natural way we found to repel them was to sprinkle egg shells around the plant base so the snails couldn't crawl over them. We also planted cilantro/coriander, garlic, and basil plants around the garden as they are known to repel insects.
Food for the plants:
We didn't want to use fertilisers or any other chemicals in the soil just so we could get more harvest. Our goal was to experiment with local materials and learn from our experience, how plants behave in their natural state, and also learn what works and what doesn't in this weather. Along with the compost found from under the dry leaves that were falling on the ground for many years, we also added buffalo and goat manure to the plants. The area surrounding us had a few farmers who regularly walked their buffaloes and goats for grazing. These animals left a lot of healthy manure as they walked around. This is usually a valuable material and is sold at a high price. But the manure that was dropped on the farms was not collected by the farmers as the quantity was too little and the effort to collect did not have a lot of return for the farmers. And to our luck, we found some of this manure lying on the ground during our walks and we collected it for our plants. The buffalo manure was easily dissolvable in water and we added the water and buffalo manure mixture directly to the plants; however, the goat manure was hard and and it dissolved in water slowly. We heard it normally gives away nutrition over a period of about three months. So we added the goat manure to the base of the plants so it can release the nutrients every-time we watered the plants.
 |
| Buffalo manure collected from our walks |
 |
| Buffalo manure mixed with water |
Problems with growth:
The biggest problems we had with growth of the plants was the intense sun and the hot air blowing from the dry areas. And the water was another issue.
- The surrounding areas around the farm were extremely dry and during the day whenever the wind was intense, it was combined with intense heat. The only way we could avoid this is by creating a barrier around the farm. We couldn't find natural resources around the area that could be used for this purpose, and we also didn't wanted to invest in artificial materials that were not re-usable.
- To protect from the sun, during the peak sun when the temperatures were in high 30s, we had to create a shelter for the plants that could be put on and off when necessary. This was another item that needed a lot of work and investment that we didn't want to do.
- Water was not always available. There were many days that the water pipe next to our garden did not have water. We had to carry a bucket and transport water from about a 100 metres away and sometimes we had to wait until the water was back, which was either the evening after the sun sets or the next morning. This also was not very conducive for the small plants to survive and grow.
- The hard sandy soil was not too forgiving for the plants that grew underground like potatoes, carrots, beetroots, and groundnut seeds. Even though we tried to water and keep the ground wet, the roots could not push through the hard soil to be able to grow and produce harvest.
Harvest:
The harvest was very small - a few beans, a few ridge gourds, tomatoes, chillies, and water melons.
 |
| Garden after a round of watering |
 |
| Watermelons |
 |
| Ridge Gourd |
Even though the final output was very little, the journey and experience of growing a garden from scratch gave us a lot of experience and understanding of the needs of the plants, the issues with sprouting, nutrient requirements, water requirements, about predators, insects, soil conditions, and most importantly about each type of plant and its growth behaviour. We feel luck that we finally found a place to experiment with gardening and learn about plants and soil.


Comments
Post a Comment